.jpg)
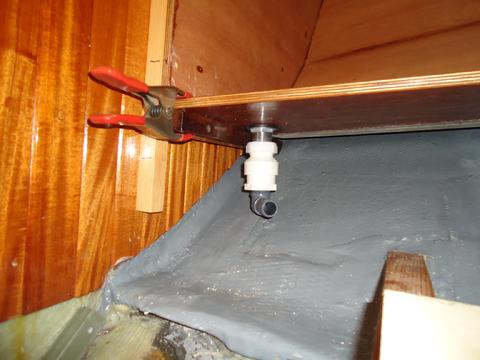
19 May 12Yesterday I started work on reinstalling the deck hatches. Nothing has been simple so far and so in keeping with that theme this has proved to be difficult as well. The hatches are the original Bomar Offshore 100 series. I sent the top half to Hatch Masters and they did a nice job rebuilding them and switching from the 3/16" Lexan to 3/8" acrylic. They are still in the box. Before I can install the hatches the frame work that supports them has to be rebuilt. The boat had a fiberglass headliner. If you look the photo to the left you can see Cape Dory did not do a good job with the deck mold to properly fit the Bomar hatches. The the hatch frame extends past the hatch opening. The area under the hatch frame was originally trimmed with 5/8" teak. That screw you see in the photo was drilled into the very end of one of the teak trim pieces. Some of the screws had little to nothing to grab. Originally there was exposed balsa core all around the opening. The screws when into the upper skin and then into the unsealed balsa core. Notice also that the caulking grove sat on top of the wood trim. IMO this was a terrible design. There was very little holding the hatch on. I suspect green water on the deck could tear the hatch right off. I needed a new plan before I could reinstall the hatch.
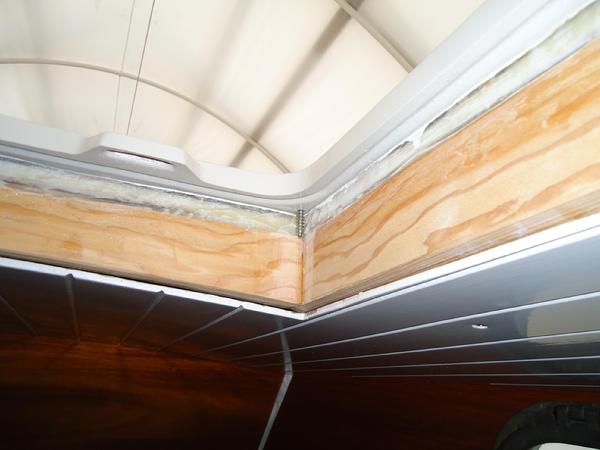
Note the screw originally went into the very end of the wood trim that would have been positioned under the caulking groove. Not good. Also not the caulking grove was built over the wood trim.
After thinking about the different ways this could be addressed I emailed my most trusted advisor. He provided several experiences and reasonable ways to address the problem. After thinking about the options I decided to substitute some premanufactured fiberglass for part of what was originally the vertical wood trim. This would keep everything the same dimension as originally used but not put wood under the caulking groove which you can see in the top photo. But, I decided to keep reinstall wood trim for the lower half. The fiberglass trim will be painted white to match the overhead. The wood trim will be varnished mahogany. Also, I decided not to use self tapping SS screws to secure the hatch frame but 1/4" machine screws instead. That means I'll have to tap the holes. It did a test tap on a piece of the scrap fiberglass I plan to use and it worked fine. So, the corner holes will be tapped into the edge of the premanufactured fiberglass trim I plan to install. The rest of the holes will drilled and tapped into the existing original deck hatch frame opening. It's not a perfect solution but it seems like the best of the several options short of major surgery.
In this photo you are looking down on one of the scrap wood pieces I used as a jig to build up and even out the edge of the hatch opening with thickened epoxy. If you look close you can see my pencil marks where the screws will be installed into the deck hatch frame.
First, I needed to make sure the cutouts were square and even all the way around as the edge of the hatch opening was concave and would only make the installation more difficult if left uncorrected. To accomplish that I cut some scrap and covered it in packing tape. I smeared some thickened epoxy on the edge of the hatch opening and screwed the scrap to the wooden subframe I installed last fall. I cleaned up the squeeze out and let it sit over night. Today, I removed the scrap wood. I removed the amine blush with water, scrub pad, and paper towel. I sanded it by hand with 60 grit abrasive. Next, I took a 12"x 24" piece of 1/2" thick piece of premanufactured fiberglass and ripped into into 1" wide strips. I used an old Freud Diablo 26T thin kerf blade. I wore a paper suit, full face repirator, gloves and had both vacuums running to collect the fiberglass dust. I used featherboards for safety. The blade was pretty much destroyed in the process but I was prepared for that. It was one I kept on hand for just such a purpose. It was nasty work but I was glad to get it behind me.
Next, I ran one edge of the strips through the portable bench top router with an old 1/8" round-over bit I previously used on some G10. I measured the hatch openings and cut them to length. I taped off the area around the hatch opening. I test fit all the pieces to make sure they fit properly and my clamping system would work. Satisfied, I numbered the strips sanded the back side with 60 grit abrasive paper. After vacuuming and performing an acetone wipe down I wet out the edge of the hatch opening and the back side of the trim pieces. I mixed up some thickened epoxy, trowled it on the strips, and clamped them in place. I removed the tape and left it for the night. Its aggravating to have to fix what should be basic boat building practices. I have run across numerous problems like this during the course of the rebuild--core areas penetrated by hardware not properly sealed resulting in large areas of rotted core, lack of limber holes in the bilge that rotted one of the bulkheads, mild steel backing plates that can't be easily accessed, hundreds of unnecessary holes drilled in the deck (many of which leaked), bulkheads tabbed on only one side and some not tabbed across the top, etc. Of course, this kind of sub par work is not limited to sailboats. It's associated with nearly everything we buy in the modern world. On the other hand, much of the boat was well built and I think (I hope anyway) I have corrected all the problem areas (at least all the ones I have found) in as professional a manner as my skills permit. It has added extra time to the rebuild. But we are well past the corner and though not quite on the home stretch most of what lay ahead is not that daunting.

The fiberglass trim epoxied in place. These peices will sit under the edge of the frame replacing the original wood. There is also more room for the screws so they are not installed right on the edge of the opening.
17 May 12Today I applied two more coats of epoxy to the interior surface of the sitz tub. I started off by scrubbing the fillets with some water and a maroon 3M scrub pad to remove any amine blush. I wiped it dry with paper towel and let it sit to further dry while I gathered the supplies I needed to brush on the epoxy. Then, I ran some personal errands and ate lunch. After lunch I sanded the fillets with 120 grit which took about an hour. I vacuumed the dust and performed a final acetone wipe. It was time to epoxy. I mixed up some West Systems 105 resin with 207 clear hardener. This is the same hardener they recommend for use when building kayaks and you are going to finish them bright. It is formulated so it does not produce amine blush. I applied the epoxy with a short bristled 3" "chip" brush that cost about $1.25 at Lowes. I tipped with a 3" Jen Poly foam brush that I bought from Jamestown Distributors--36 brushes for $9.00. I applied two coats over about four hours from start to finish. I am not sure if I will leave it as is or if I will eventually apply two part polyurethane. I'll see how it looks tomorrow. I need to get a couple of coat of varnish on the inboard side of the tub's vertical panel and apply a couple more coats of varnish to the quarter sea-berth vertical panel. I may work on the deck hatches after that or go straight to the ice box. I'll think about it some more tomorrow while I'm varnishing.
.jpg)
The second and third coat of epoxy applied. The fillets are a little darker than the mahogany but not bad. The black marker lines on the doug fir cleats show me where the screws are located. All that will be covered with bare teack trim.
16 May 12Today we installed the last panel on the sitz tub. The first step was to remove the clamps from yesterdays work. Then I scrubbed the edges down with a little water and a 3M scrub pad to make sure I removed any amine blush from the 105/206 resin/hardener I used yesterday to install the middle section panels. I wiped it dry with plain white paper towels. I also sanded the inside surface of the inboard vertical panel with a finish sander and 120 grit abrasive. I had previously applied one coat of 105/207 clear UV hardener. I made one more round of sanding the edges where the fillets would be applied with 80 grit abrasives. I temporarily installed the panel so all the holes and countersinks would be completed before I epoxy glued the panel in position. Then, I prepared all the supplies I would need in the boat. I vacuumed all the surfaces and performed one last acetone wipe down.
.jpg)
We added mahogany wood flour to the epoxy tfillets o help them blend in better. The tub is sanded so it looks much lighter than it will when it is varnished.
Once we were ready, Gayle mixed the G/Flex epoxy with colloidal silica and a little mahogany wood flour till the color looked about right. I previously sifted the wood dust through several strainers so that it would be flow on smoothly. With out the wood flour the fillets would be a light creamy yellow due to the color of the G/Flex and the silica thickener. We trowled the mixutre into a 75cc syringe and I laid a bead along the joint and then used a rounded plastic stir stick to make the fillets. She continued to mix epoxy and load the syringe while I focused on making the fillets. This saved a great deal of time with the curing clock running . . . tick, tick, tick. After applying the fillets to the back panel vertical and horizontal joints we stopped while I installed the vertical inboard panel. I started the fillets with it removed so I had better access to the tub surfaces. With all the holes predrilled it took less than five minutes to install. We quickly mixed up some 105/206 with colloidal silica and applied it at the bottom of the panel and the Iroko cleats I installed yesterday to ensure there could be no gaps between the two. I screwed the panel on and removed the squeeze out. Then, we applied the final fillets. After that I cleaned up the edges around the fillets as required and policed up the area. That completed the day. I am very happy to have the installation of the sitz tub behind me. Tomorrow I will remove any amine blush, sand the fillets till I am satisfied with them, and then lay on two finishing coats of 105/207. The outside of the vertical panel--the part you can see from the centerline of the boat--will be varnished. The edges will eventually be trimmed with bare teak and ash ceiling will hide the hull.
15 May 12Finally, today I epoxied the sitz tub middle panels to the end pieces. I sanded the single epoxy coat I applied yesterday to the end pieces and the center panels with 120 grit abrasive. I used 80 grit along the edge where the inside fillet will eventually be located. I wet out the cleats and the under side of the center panels with unthickend epoxy. Next, I mixed up 105 and 206 slow hardener with colloidal silica and trowled it onto the cleats on the end pieces. I used a plastic stir stick to create a little bit of a bevel to the thickened epoxy laying on the cleat so that it was neatly beveled to the outside edge. Then, I placed the center panels into position. I had just the right amount of squeeze out and the panel sat perfectly in position. I installed three # 8 screws that I had previously drilled to keep the panels in position and apply a little pressure to the cleats. I clamped the bottom inboard edge of the panel with two spring clamps. Next, I mixed up a little System Three T88 (the same epoxy I use on the staving) and epoxied two more cleats to the bottom inboard edge of the lower panel. This will give me cleats on the bottom of the tub to screw the inboard vertical panel into when it is time for it to be installed (tomorrow?). I wiped up excess epoxy with a stir stick and cleaned everything up with an acetone dampened paper towel. Then, I installed three mahogany wood plugs over the screws heads.
.jpg)
Stiz tub epoxied into position. The rest of the tub is sanded with 120 grit abrasives.
After installing the sitz tub I applied the third coat of varnish to the quarter sea-berth vertical panel and the inside of the locker. It really warmed up here today so it was hot work. Sanding all the little areas in the locker took most of the time. However, the inside of the locker only requires three coats so I am done with the locker. The vertical panel will get five coats of varnish. I may stop at three for now--same as the rest of the boat--or I may press ahead so I can have finish off the quarter berth and add the walnut trim to the top edge of the vertical panel. Time will tell. I had a little trouble with my varnish brushes today. I have them hanging in one of those plastic box designed for just that purpose. They hang in kerosene. I noticed some of the brushes had collected a yellow grunge on them even though they were hanging in the kerosene. Turns out it was varnish. If you don't varnish often, that can happen unless you thoroughly clean them before you hang them in the kerosene. I usually, clean them by dipping them in a separate jar of kerosene, spinning them down with a spinner a couple of times, working through the bristles with a brush comb several times, then hanging them in the solution. Apparently, I was still not cleaning them well enough. So, I spent some time this evening cleaning them up. I also use foam brushes and though they are a lot simpler to use in many ways when it comes to the staving the badger hair brushes give me the best results. If I did not have staving to varnish I might only use foam brushes.
.jpg)
Third coat of varnish.
14 May 12The next day I flipped the quarter berth panel over and applied one coat of varnish thinned 50 percent to the back side. I then sanded the vertical panels in the quarter-berth locker and applied a coat of varnish to them and to the cleats as well. The next morning sanded the newly varnished panel with 180 grit, vacuumed the dust and wiped it down with denatured alcohol. I installed the panel by drilling holes for #10 FH SS 1 ½” screws. The fasteners near the head of the berth were easy but the others were difficult as the space between the fore and aft bulkhead inboard of the quarter-berth panel gets smaller and smaller as you move aft. I had to use a 90 degree adapter for my drill and assume all kind of contorted positions to get the job done. My knees are not in very good shape after all those years as as an infantry and reconnaissance Marine. This kind of physical effort is easy to overlook if you still think of yourself as perpetually 19 years old. Today was a reminder that . . . well . . . I am not as young as I think . . . sometimes. Next, I installed the wood plugs and gave the glue about an hour to cure. I trimmed the plugs, lightly sanded around them and applied the second coat of varnish thinned about 25 percent to the panel and the insides of the locker.
.jpg)
The second coat of varnish applied to the quarter berth.
I had a very helpful phone conversation with Tom Pollock in the technical office at West Systems today. He is a wealth of knowledge and took the time to look at the pictures of my sitz tub while we discussed the best way to glue it up. He agreed that I should epoxy it to the cleats that are installed on the end panels. We discussed the inside fillets and he suggested I should use G-Flex epoxy instead of 105/205. I have used G-Flex before and written a post about it. Though it is a little less strong than 105/205 it is not as brittle. In fact it will elongate 30 percent before it breaks. We discussed the advantages of the fillets being able to flex a little no knowing if there will be any panel deflection due to being tightly fastened between two major bulkheads. He also thought I could eliminate the tape to the inside fillet and also told me that because G Flex gives more than 105/205 it makes up for the strength and in fact "break tests" show it to be just as strong. He advised me to apply a one coat of 105/207 (207 is the clear UV stabilized hardener which I have on hand just for this project) and let it cure. Then install the panels and apply the fillets to the cured coat of epoxy (sanding it first of course). By applying a coat of epoxy to the panels first the thickened G Flex will actually have better adhesion for this kind of application. So, after completing the varnish work on the quarterberth I applied the first coat of epoxy to the panels. I waited for the temperature to start dropping so the condensing air would pull the epoxy into the wood and also eliminate bubbles forming on the surface.
.jpg)
First coat of 105/207 applied to the end panels.
12 May 12The next step for the sitz tub was to cut a piece of 1/2" okume ply serve as the core for the vertical panel. Next, I ripped the 3/4" mahogany into narrower planks--less than 6". Next, I stood them on edge and "resawed" them on the table saw. Next, I ran them through the planer and took them down to an even 1/4" thick. I jointed the edges and then back beveled them slightly with a hand plane to the top edges would fit together flush. Then, glued one layer to the okume ply with System Three T88 epoxy, clamped it to a strong back, and let it sit over night. The next day, I unclamped it and applied the mahogany to the other side and reclamped it. Today, I unclamped it, smoothed it with a cabinet scrapper, and sanded it with 120 grit. I checked it for fit. Satisfied, I applied one coat of West Epoxy with 207 clear hardener to what will be the inside surface of the sitz tub and set it aside.
.jpg)
.jpg)
.jpg)
.jpg)
I let the quarter berth vertical panel remain clamped up for a couple of days. Today, I removed the screw block clamps. I cut a couple of hundred 3/8" plugs from some scrap mahogany. I counter sunk the 111 holes used to fasten the screw block clamps and plugged them. I used Titebond III glue and let the plugs sit for a couple of hours. Then, I trimmed them with a chisel and sanded the staving with 120 grit paper. I applied the first coat of Epifanes high gloss varnish cut 1;1 with mineral spirits and left it to sit over night.
.jpg)
.jpg)
.jpg)
.jpg)
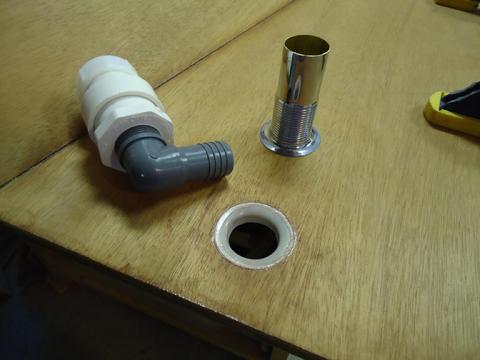
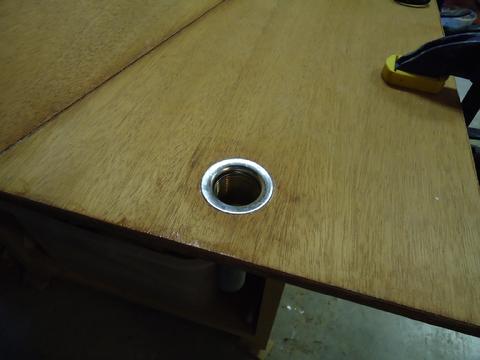
8 May 12Over the last week I have worked on the sitz tub drain (sit down shower) and the quarter sea-berth at the same time. I have been too busy with with numerous reponsibilites to spend much the website so I got behind on the daily log. In an effort to catch back up I have assembled a couple of photo galleries below. There are two entries: one for the sitz tub drain and one for continued work on the quarter sea-berth. There is a longer narrative for the quarterberth work. For the sitz tub I used a standard 1 1/4" bar sink drain I bought from Ace Hardware. It is chrome plated brass. I have not used any bedding compound. I will have to pull it out before I glass in the tub with fillets, cloth tape, and several coats of epoxy. After drilling the hole and fitting it for the drain I began to develop the plan for the inboard vertical panel. A/B grade Marine Mahogany only has one good face. You'll be able to see both side of the inboard vertical panel--from outside the tub and inside. We plan to finish it bright so we need to "A" sides. The solution is to make our own A/A panel. I purchased some additional A. Mahogany and while milling the staving to 3/8" (I resawed 4/4 A. Mahogany to get two pieces of 3/8" I also milled some rough planks to 3/4". Then I set the 3/4" aside to work on the quarter berth. Once the quarter berth is finished I'll resaw the 3/4" planks to get two 1/4" pieces from each plank. The plan is to glue them to 1/2" okume to get a very stiff A/A sided panel that will be epoxied and tabbed to the parts already built and installed. If it sounds confusing it will be made clear when we get the pictures of the execution.
.jpg)
.jpg)
.jpg)
.jpg)
.jpg)
.jpg)
.jpg)
.jpg)
.jpg)
.jpg)
8 May 12 Entry for the Quarter Sea-berth. (Photo gallery below.)We needed to apply the grey Bilge-Kote paint before we tabbed in the lower panel. Interlux wants you to epoxy their two part Epoxy Prime Kote primer before you apply the Bilge-Kote over epoxy. This is to ensure proper adhesion over any amine blush that develops. But, if you remove the amine blush (like you should anyway) there shouldn’t be any problem anyway. I always scrub the epoxy with water and a 3M maroon scrub pad and then wipe that up with paper towel. But, I had only put the epoxy on a couple of days before and it sometimes take a week or two to fully cure . . . and since I had some Epoxy Prime Kote on hand I mixed up a small batch applied it over the areas that had fresh epoxy. It’s terrible stuff to use by the way. Then, the next day I scuff sanded it and applied the Bilge Kote. Next, I tabbed in the lower panel incorporating a few drain holes should water ever end up in the bottom of the locker. Next, I worked on the platform for the bilge pump epoxying in the bolts from the bottom side of the panel so the pump drops down over the four studs. That way I have access to just the nuts and shouldn’t need to get a wrench underneath to the bolt side to remove them. I also had some 1/16” hard rubber strips that I placed between the bottom of the bronze body of the pump and the platform it sits on. This should reduce the chance of the bronze body causing abrasion to the epoxy coated platform it sits on when the pump is used. I had to keep checking the fit and clearances around the pump as it is a tight fit. I wanted the berth to be as large as possible (but not too big for a sea berth) and yet still be able to remove and service the pump as required. With that done, I installed the A. Mahogany cleats on each end of the berth (on the bulkheads) to support the vertical panel. They are cut with a 7 degree bevel since the sea berth is not parallel to the centerline of the boat. I used door-skin ply and a hot glue gun to make templates for the dividers. I clamped a 2x4 (I milled it on the jointer to make sure the edge was straight) to line up all the inboard sides (bulkhead cleats and inboard edges of the dividers). Once satisfied I cut the dividers from ½” okume. I had to cut a 7 degree bevel on the inboard edge to match the bulkhead cleats. I test fit them and then removed 3/8” to accommodate the foam pad wedge. I also cut a series of 2” holes to aid in ventilation for the lockers. I applied three coats of epoxy to the end grain of the dividers then tabbed them in position, held along the bottom edge by the 1”x1” ash cleats. Next, I installed ash cleats along the inboard edge of the bottom panel. I attached them with ¼” bolts so I can more easily remove the vertical inboard panel (that will be screwed to the cleats) if ever necessary. Also, I want the vertical panel to be really stout as I may use the under berth storage for batteries if it lends itself to trimming the boat. I installed ash cleats along the vertical edge of the dividers as well—also cut with a 7 degree bevel. I used doug fir for the cleats that support the bunk board because that is what I had and because I don’t need the same strength there as I do for screwing the vertical panel in place. With that completed it was time to make the template for the vertical panel which I did with doorskin and the hot glue gun. I used ½” okume for the panel. It ended up being 17 ¼” tall and about 74 ¼” long. I test fit it several times. I bought 20 board feet of A. Mahogany and used about 8 BF to mill the staving (36 pieces 17 ½” long by about 2” wide) for the quarter berth. In addition to using newly milled staving for the quarter berth I incorporated some of the last of the original staving I made last year. The old staving never made the grade for the other parts of the boat. These pieces were about 8’ long and had too much uneven grain, back striping, and other defects to be of satisfactory quality. But since these pieces only need to be 17 1/2” long I was able to chop it up and get about 10 pieces. I positioned these pieces way down at the end where they will likely never be seen by anyone but me. In reality, once cut down, they looked pretty darn good though a little darker than the freshly milled staving. Because the vertical panel was not secured in position, if I glued staving to only one side the of the vertical panel (which was the plan all along) it would warp. I could not install the staving with the panel in the boat because I couldn’t get the drill into the tight space I had to work with. So, I built a simple platform – a strong-back if you will—out of 2x4s in my shop. I clamped it vertically across my table saw and outfeed table. Then I clamped the panel to that. I installed the staving with the panel in the vertical position in about three hours. If you drill the holes for the 100 or so screw clamps with the panel laying horizontally the dust and debris from drilling gets in the epoxy squeeze-out and caused difficulties. It is so much easier to use gravity to your advantage. Once the staving was installed, I laid the whole thing down horizontally and clamped the panel, with the newly installed staving, to the strong back. My hope is that the epoxy will cure with the panel clamped flat so that when I remove the clamps it will be perfectly flat and I can install it without any issues. No issues and no drama would be nice.
.jpg)
.jpg)
.jpg)
.jpg)
.jpg)
.jpg)
.jpg)
.jpg)
.jpg)
.jpg)
.jpg)
.jpg)
.jpg)
.jpg)
.jpg)
26 Apr 12Yesterday, I worked on the quarter sea-berth. I used the template that I made the day before and traced it out on a piece of 1/2" BS 1088 Okume plywood. It took a while to plane the edges down and get it to fit just right. Eventually It will be glassed to the hull with a single layer of biaxial. Vertical support will be attched to it and that will support the bunk boards. Today was spent installing the Edson Model 117 bronze bilge pump. It's a huge heavy pump. It must weigh about 40 pounds. I found it several years ago at a consignment shop for about $200. It had never been used. I temporarily mounted it near the companion way ladder where the front of the engine used to be. But I never liked it there. It used up too much space. Once we decided to convert the quarter berth to a smaller sea berth we found a spot where it won't be in the way yet will always be accessible. We need for it to be convienent because in addition to pumping the bilge it will also serve to pump our grey water tank where the sink and shower drain into. Despite having found a space it was challenging to get the pump mounted. The space is small and constricted, the bottom of the hull is rising quickly, and a way to bolt it in was not obvious. Also, I want to be able to take it out if necessary thus I fiddled with it for several hours making sure I could remove it. The one problem is the cockpit scupper seacock is right in the path of the bilge pump exhaust line. Is there no justice? That seacock, which I moved from the other side of the bulkhead, where the engine used to be, has caused several problems . . . this despite a lot of thought about what would go where. At the time, the pump was mounted on the other side of the companionway so when I moved it I thought I was very clever. It reminds of that old saying, "No good deed goes unpunished." The support that holds up the aft end of the pump is white oak. After positioning it with a thick fillet of epoxy I added a piece of 4" wide biaxial to each side. I mounted the pump on a piece of 3/4" BS 1088. I spent a too much time trying to use white oak for the pad but I could not make it work. Exasperated, I finally gave in and went with the ply. I will coat it with epoxy and may paint it with bilge Kote. If it goes bad I'll replace it later . . . at least I can get to it.
.jpg)
.jpg)
.jpg)
.jpg)
24 Apr 12I have two projects going now. I am still working on the sitz tub and during the down time while the epoxy cures, etc, I started work on the quarter berth. Sitz Tub (See the gallery below). I was not satisfied with using the teak as supports behind the forward and aft panels of the tub. Teak is great wood sure, but I knew eventually it would be a problem. It would get musty and it would aggravate me. So, Friday it occurred to me that McMaster Car might have some fiberglass stock I could use. Sure enough, they had hollow, box, 1"x1" fiberglass stock. I ordered two sections of 5' each and it arrived first thing Monday morning. After I ordered the fiberglass I installed a 3/4" Iroko cleat on the outside of the middle panel where the seat cleats will be secured. I needed something thicker than 1/2" ply to secure the cleats to. The teak seat that the occupant will sit on will be supported by the cleat so there will be a fair amount of weight on it. Monday, I cut the 1"x1" fiberglass stock and installed it where the teak was. Problem solved. Next, I glassed in a support under the center of the tub. Today, I took some additional fiberglass 1"x1" stock and epoxied it to the outside of the outboard edge of the top panel as a stiffener. Then, I coated the Iroko I installed yesterday on the outside of the tub and the support that will provide additional support under the tub with two coats of epoxy. I thinned the first coat with acetone to help it better penetrate into the wood. After is was tacky to the touch I applied another coat that was just straight epoxy. I let them cure and this evening I set the panels in place back in the boat.
.jpg)
.jpg)
.jpg)
.jpg)
.jpg)
.jpg)
Building the quarter berth. In between the work on the sitz tub I began work on the quarter berth. This is an interesting project. The original quarter berth was very low and not an efficient use of space. Like a lot of boats there was a chart table just forward of the quarter berth. One sat on the head of the berth with one's legs under the chart table to use it. It seems to be pretty much the standard way of getting a chart table on boats between 30 and 40 feet. If someone is sleeping in the quarter berth you can't use the table. Some folks build a back support for the chart table but then you can't use the quarter berth. We didn't like the arrangement. We don't want to waste the space for a sitting chart table. So, we tore the chart table out and will build the icebox there and use the top of it as a stand up chart table. Because the quarter berth was so low there was a lot of wasted space. You couldn't put much under it because it was so low. I guess you could build cabinets over it. But the other problem with it, and with all the quarter berths I have ever slept in is that it is too big to hold you in place when sailing off-shore and too small for two people--unless you are really close and it's not too hot. To be honest, we would not even have a quarter berth if we did not have four people on the boat. We would turn it into a work bench or additional storage. But we need at least one more sea berth. I have been thinking off and on for months about how to build a sea berth in this space. It's tricky. Some of the designs we came up with proved impractical. Mock ups made it clear that even an Olympic gymnast would have difficulty getting in and out of the berth. It is just an awkward space. But, we finally came up with a design we think might work OK. To do this, we will decided to raise it up 16" and gain more storage space under it. We will push it outboard. Instead of being 38" wide at the head it will be about 24" wide 18" wide at the foot. That will leave room for a watch seat at the foot of the companionway ladder and a spot for the big bronze Edson bilge pump just aft of the seat. There will be additional storage under the watch seat. By raising the berth up and pushing it outboard a little the watch seat essentially serves as a step. And we think there will be enough room to sort of crawl up into the berth instead of crawling into it head first and having to turn around which was the usual technique before. No disrespect to Mr. Alberg but something tells me he never had to sleep in one of his quarter berth designs. Maybe he meant it for kids . . . or just to pile cockpit cushion onto. Anyway, if the berth design works out, it will allow us to have the forward double berth in port and an additional quarter sea-berth when sailing off shore. The kid's will have full adult size pilot berths to call their own and the settees will be open for sitting and lounging 24/7. I started off work on the quarter berth by building supports between the two bulkheads. I did that several months ago. Today I installed cleats on the supports and one along the forward bulkhead. Because the hull rises up through the quarter berth the lower plywood panel, which will be the bottom of the storage compartment under the quarter berth, will not be full length--the rise in the hull does not allow it. The original berth had ash strips that support the aft end of the bunk cushion. Instead, I will install the plywood bottom but it will run only 47" down the length of the compartment. That will be the main storage area. Aft of that, I'll probably just reinstall the original ash cleats on the ribs you can see in the photos below. I used my normal technique of cutting door skin and gluing it with a hot glue gun to make a pattern. Tomorrow I will cut the plywood to form the bottom of the locker and then continue the work to build vertical supports that will be epoxy taped to the hull and to which the inboard vertical face of the berth will be attached.
.jpg)
.jpg)
.jpg)
.jpg)
.jpg)
.jpg)
.jpg)
19 Apr 12I am continuing to work on the sitz sit-down shower tub. Yesterday, I worked on the cleating system and replaced the lower horizontal douglas fir cleats with some 1”x1” teak I had on hand. I also angled it down instead of positioned horizontally as I had with the Douglas Fir. I rationalized that if any water got on those lower cleats (and it will eventually) the water would run down and drip off to the fiberglass hull vice sit there on the wood and cause problems. I test fit everything to make sure it was still lined up. Today, I gave a good acetone wipe down to the Iroko and glued them to the edges of the forward and aft panels with thickened epoxy. The tub sits on those cleats. Then, I applied two coats of epoxy to the Iroko, thinning the first coat with a little acetone which helps it penetrate a little better. Adding even five percent acetone by volume weakens the epoxy but since I am using it as a coating the strength is not so important. Next, I used a 1 ¼” hole saw to cut a series of holes in the two bulkheads on the forward and aft sides of the head compartment so air can move around the tub. It is stale air and moisture that causes mildew and rots wood. The air holes are important. I spent some time trying to make them nice and lined up but there was no good way because of the numerous obstacles to content with such as wood plugs (with ss screws buried up them), cleats, dividers on the other side of the bulkheads, etc. So, I did the best I could and cut a total of 12 holes in the two bulkheads. The holes will not be visible as they are all contained within lockers, settees, and under berths. Then, I took my rotozip with a ¼” collet ¼” round over bit and smoothed out the edges of the holes. The round over is not for looks, though it does give the hole a more finished appearance. It keeps the epoxy from “pulling back” from the edge like it will with a 90 degree turn. The same thing happens to paint and varnish. A gentle bend allow the surface of the coating to follow the turn and to remain thicker and provide better protection to the wood underneath.
I have mixed feelings about coating wood other than plywood with epoxy. As my mentor has pointed out, wooden boats have been around a long time without epoxy. There are often other ways. Epoxy is not a be all solution. It is a tool and needs to be used correctly. And, sometimes epoxy and cause problems. If water gets to the wood under the epoxy and the wood can’t breath and dry out it can be worse than if you had just left it uncoated. But there are times when it makes sense. In this case, I can’t get to the area behind the tub. So, I will protect it best as I can. I did, after much thought, decide to leave the teak cleats uncoated. Since they are not attached to the tub, but really serve to wedge it in place I thought any coating might get scraped off over time as the tub moves around a little with the working of the hull and the crew crawling in and out of it. If so, the protective layer could be broken could seep in under the coating. Better to rely on teak’s great resistance to rot aided by the air holes through the bulkheads. Such is my rationalization for the day.
I have mixed feelings about coating wood other than plywood with epoxy. As my mentor has pointed out, wooden boats have been around a long time without epoxy. There are often other ways. Epoxy is not a be all solution. It is a tool and needs to be used correctly. And, sometimes epoxy and cause problems. If water gets to the wood under the epoxy and the wood can’t breath and dry out it can be worse than if you had just left it uncoated. But there are times when it makes sense. In this case, I can’t get to the area behind the tub. So, I will protect it best as I can. I did, after much thought, decide to leave the teak cleats uncoated. Since they are not attached to the tub, but really serve to wedge it in place I thought any coating might get scraped off over time as the tub moves around a little with the working of the hull and the crew crawling in and out of it. If so, the protective layer could be broken could seep in under the coating. Better to rely on teak’s great resistance to rot aided by the air holes through the bulkheads. Such is my rationalization for the day.
.jpg)
.jpg)
.jpg)
.jpg)
.jpg)
17 Apr 12Yesterday, I wet the edges of the two joints between the horizontal panels and the floor of the tub. I secured them in place with small screws and two spring clamps. Then, I mixed up some epoxy thickened with cabosil and reached underneath to fill the gap between the corners of the outside corner (the inside corners being on the inside of the tub faces toward the center of the boat). I let it sit overnight and then spent time researching a suitable drain. By bonding the panels together using the cleats as a jig, so went my thinking, I could remove them from the boat and they would remain correctly aligned. Then, I could apply biaxial tape to the back of the two seams I can't get to when they are mounte in the boat.
.jpg)
The panels slid right out and did not break.
.jpg)
I could not tape to the edge as that part of the panel sits on the Iroko cleats.
I was a little concerned I would not be able to remove the panels the joint breaking but I had no problem. They slid right out. I took them into the shop set up a little jig and sanded the outside of the panels. I fully expected to know the panels off the work bench and but the joints at some point. But, luck was with me. No disasters. If filled the remainder of the seams with thickened epoxy. I remove the forward and aft panels from the boat and sanded the outside of them as well. Next, I applied two layers of 17.08 biaxial tape (5" and 4" wide) to the back of the horizontal panels and the floor panel. The rest of the day I spent brushing on three coats of epoxy. Tomorrow, I will work on the cleats in the boat and drill the holes in the bulkhead so air can move around the tub.
15 Apr 12I got a lot accomplished today. I started off by rechecking the temporary cleats I taped in place yesterday. Satisfied that every thing still fit, I took some measurements with a bevel gauge to determine what kind of angle I would need on the permanent Iroko cleats. The angle is necessary to match the tub that isn't square--it gets wider from forward to aft due to the widening of the hull. The angle is 11 degrees. I then all the panels out of the boat and ripped 1"x1" Iroko cleats and then ran them back through the table saw to get the correct bevel. I installed them with 1/4" bolts. It's way over kill given that they will also be epoxied in place but "nothing to strong ever broke" and I can't easily remove the tub if there is a problem . . . so let's not have a problem with it. "P" for plenty as we say when using demolitions in the Marines. Next, I added some additional Douglass Fir cleats to add to the rigidity of the foward and aft panels. Then, I reinstalled the forward and aft panels. I then built templates one at a time to the new cleat system and used them to trace the patterns on what was left of the 1/2" mahogany plywood. When looking for a close fit you get better results if you build each template next to the panel just installed. That way you reduce the chance of a compound error. I used my circle saw to cut the panels from 1/2" mahogany plywood. I cleaned up the edges with a block plane. The panels were a snug fit as I had not cut the bevels to match the 11 degree bevel on the cleats. I cleaned up the edges with my block plane and then used the plane to add the correct bevel checking it with a combination square. I was very satisfied with the final fit. After that is was time to clean up the boat and the shop and call it a day. This week I will start applying epoxy to the panels and cleats and begin the process of "stitch and glue" to connect the panels.
15 Apr 12I got a lot accomplished today. I started off by rechecking the temporary cleats I taped in place yesterday. Satisfied that every thing still fit, I took some measurements with a bevel gauge to determine what kind of angle I would need on the permanent Iroko cleats. The angle is necessary to match the tub that isn't square--it gets wider from forward to aft due to the widening of the hull. The angle is 11 degrees. I then all the panels out of the boat and ripped 1"x1" Iroko cleats and then ran them back through the table saw to get the correct bevel. I installed them with 1/4" bolts. It's way over kill given that they will also be epoxied in place but "nothing to strong ever broke" and I can't easily remove the tub if there is a problem . . . so let's not have a problem with it. "P" for plenty as we say when using demolitions in the Marines. Next, I added some additional Douglass Fir cleats to add to the rigidity of the foward and aft panels. Then, I reinstalled the forward and aft panels. I then built templates one at a time to the new cleat system and used them to trace the patterns on what was left of the 1/2" mahogany plywood. When looking for a close fit you get better results if you build each template next to the panel just installed. That way you reduce the chance of a compound error. I used my circle saw to cut the panels from 1/2" mahogany plywood. I cleaned up the edges with a block plane. The panels were a snug fit as I had not cut the bevels to match the 11 degree bevel on the cleats. I cleaned up the edges with my block plane and then used the plane to add the correct bevel checking it with a combination square. I was very satisfied with the final fit. After that is was time to clean up the boat and the shop and call it a day. This week I will start applying epoxy to the panels and cleats and begin the process of "stitch and glue" to connect the panels.
.jpg)
.jpg)
.jpg)
.jpg)
.jpg)
12 Apr 12 (Updated 14 April with additional text and photos). Below are some pictures from the recent work on the sitz shower tub. I have been thinking about how to build the tub for a long time. The difficulty is that if the tub is built small enough to be built outside the boat and passed through the companionway, it would be too small to use. Thus, it has to be built in place. However, because the space is so tight and restricted if I use the stitch-and-glue method I won’t be able to get to the back side of the tub to tape the joints. The tub, though only used for sit down showers and not filled with water like a tub at home, still needs to be stout and water tight. In a perfect world I would be able to remove the tub in-tact if it needed to be repaired or if I need to get to the inside of the hull behind it. But, I don’t see how that’s possible. So, if for any reason I need to get behind the tub, it will need to be cut out with a “saws-all.” The 1”x1” horizontal and vertical Douglass Fir cleats provide a little stand off so air can circulate around the tub and so the bulkheads will be protected if I need cut the tub out.
The tub will be about 33” across the aft end and about 27” across the forward end. It will be about 33 ½” long and about 27” deep from floor to top edge. The inboard side will be vertical while the outboard side will have “chines” and generally conform to the shape of the hull. The tub will be made with 1/2” marine grade mahogany plywood. It will be coated with numerous coats of epoxy inside and out to include the end-grain. The inside corners will have thickened epoxy fillets. There will be a removable teak seat in one end set about 10” above the bottom. There will about 40” of vertical clearance between the top of the tub seat and the overhead. The side of the tub towards the boats centerline, the side you step over to get into it, will be faced with vertical v-groove staving just like the rest of the boat. The top edge will be trimmed in raw teak all the way around. The tub will drain into a grey water tank which will be pumped overboard by my manual bilge pump that will be connected to the tank via a diverter valve. The head and pump up spray bottle will be located in a seat locker in separated compartments each with a hinged teak lid that won't be visible when they are not in use. The “user” will sit perpendicular to the centerline with back to the shower tub and feet oriented towards the centerline. This will provide lots of elbow room. The seat will be nearly 35” long (fore and aft) and about 19" deep (less with the hinged lid up) so it will make a good place to sit when getting dressed when using the forward, in-port, cabin. In a perfect world I would have the head oriented fore-and-aft and I spent several days trying to make that work but there simply was not enough room. The best solution was to piggy-back on open floor space already there – the passage way between the saloon and the forward cabin -- for the “users” feet. That gave us the solution for tub and head size we were looking for.
Updated 13 Apr 12: The first thing to do was to install the horizontal and vertical cleats that will support the tub sides. I used 1" x 1" Doug Fir. I cut them to length and temporarily installed them. Satisfied, I removed them and applied two coats of shellac sanding in between each coat. Shellac is pretty good stuff. It is a great sealer and though not as waterproof as epoxy it is a lot easier to work with. It dries in about 20 minutes and can be sanded in an hour. They will never see standing water and in fact will see very little water if any at all. The nice thing about V-groove staving is it provides drainage for water and allows air to circulate. After installing the cleats I called it a day. The next day it was time to work on the plywood sides of the tub. After considerable measuring and too much contemplation I was ready. I picked up another 4x8 sheet of type I Mahogany marine grade plywood from my supplier and also some more door skin ply which I use for making templates. I ripped the door skin into my standard 1 ½” wide strips. I used my hot glue gun and tin snips to cut the doorskin to the proper lengths and glued them together creating the shape I needed for a proper fit. I removed the pattern and traced them on the plywood. For jig saws and skills saws it is best to make the cuts with the good side of the plywood down since most of the blades for these tools cut on the up stroke and it will leave a cleaner cut on the good side of the wood. It’s not very noticeable when you are cutting with the grain but it makes a big difference when cutting across the grain. Then, I temporarily screwed the plywood in place. Satisfied with the work I moved on to the next step.I wanted to use a good rot resistant wood for the cleats that will support the bottom of the tub. So, I milled some 8/4 Iroko. I had to determine the slope of the bottom of the tub. I decided on four degrees, sloping from the bow to the stern. With that decision made I ripped some Iroko into 1 ¼” x 1 ¼” cleats with a four degree bevel. This will ensure the floor of the tub lays flat against the cleats. With that done, I checked the fit by temporarily securing the Iroko cleats in place with some two sided tape. Satisfied, I drilled holes for quarter inch bolts and temporarily installed them. With the end cleats installed I laid a couple of straight pieces of wood across them and used doorskin and the hot glue gun to build a template for the tub center support. I needed it in place to support the template for the bottom of the tub. I cut the center support from a piece of scrap BS 1088 ½” plywood. I hot glued it into place. Later it will get sealed with many coats of epoxy and glassed in place. Next, I built another doorskin template for the floor of the tub. I placed some ½” blocks on the Iroko cleats to ensure the template measures the widest part of the floor (which in this case is the top). This is essential when the piece to be cut will require a beveled edge. I cut the mahogany ply and then test fit it. I spent a little time shaping it for a better fit with a small low angle block plane and a spoke shave. Later, I will trim the floor back even more but not till I am sure where the outboard vertical sides of the tub will join the floor. With this done I called it a day.
Updated 14 Apr 12: We fiddled around and wasted a lot of time today sorting out how to build the sitz tub outboard side panel. To be honest the sitz tub is kind of small though we can't really be sure till we have the seat mounted in it . . . or build a full size functional mock up and bolt it in place and that is not going to happen. I built two different side mockup panels today. The first one did not have a chine. Just a straight angled panel at about a 50 degree slant. We set up buckets to sit on in the tub and different platforms to vary the height. It was OK. Not great. Then, I built another mock up using only doorskin templates (see latest photo in gallery below) and we liked it better as we gained another 3 inches in width at seat height level. The challenge is the vertical inboard face of the tub which can't be changed if there is to be enough room for the head. The vertical panel has an adverse impact on the usable room in the tub. It cramps up your ability to move around. Well, after staring at the thing for too long, making more sketches, and looking around the boat for any other viable option--there were none--we will start building the chined two-panel option tomorrow.
.jpg)
.jpg)
.jpg)
.jpg)
.jpg)
.jpg)
.jpg)
.jpg)
.jpg)
.jpg)
6 Apr 12As soon as I cracked the four wedges from over tightening them--I think the deck was uneven under those four wedges--I made new ones and installed them the same day. As much as I hated to do it, I replaced all the bronze nuts that would be covered by the white interior panels under the side deck with 316 ss nylon lock nuts. My concern was that if the butyl tape compressed any more, the nuts would be loose and could back off on their own. I left the bronze nuts on all the other bolts, the ones I can get to in the cockpit locker, lazerette, and anchor locker.

The replacement for the cracked deck wedges. I made them a little thicker.
4 Apr 12I am still learning the characteristics of butyl. I have gently tightened down on all the nuts for the stanchion/bulwark bases for the last 3-4 days. Each time, within a few hours the nuts are no longer tight due to the butyl continuing to squeeze out. Today, was the first day some of the nuts felt like they were still pretty tight. I am not using a big wrench, just a standard handled 3/8" drive socket and a small box end wrench. I am not "gorilla gripping" it but want the nut to be a little shy of snug. That's it. Today, I broke four bases during what I thought would be the final tightening event. The good thing is I didn't break more. I also got to remove them and see how the butyl compressed. There was very little butyl between the wedge and the deck and the wedge and the base. The chamfer hole had a good amount of butyl as you would expect. The deck is kind of tricky since it is not perfectly flat--remember I glassed the hull deck joint over with three layers of biaxial and though I worked long and hard to fair it well it would be unrealistic to think it was perfect. There must have been some spot under the wedge and when I tightened down they cracked. I examined the deck after I cleaned up the butyl but I could see no obvious unevenness. So, I will mill some new wedges tomorrow and not tighten as aggressively when I install them. I'll still spread it out over a couple of days. We knew from the beginning that wood wedges had pros and cons. Well, today one of the cons landed right in my lap. Not completely unexpected but certainly unwanted.
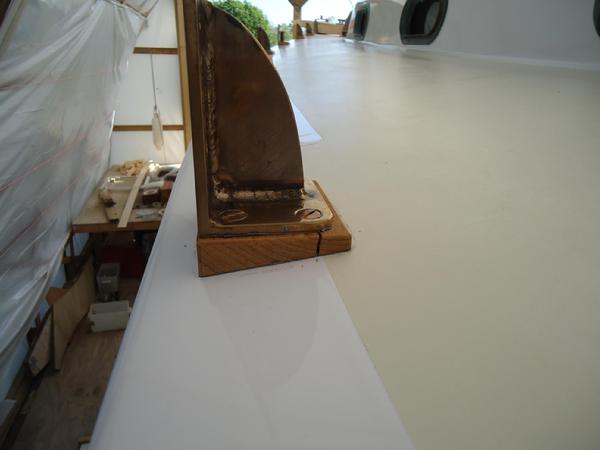
1 Apr 12Finally, at last, the "wall of bronze" is installed . . . and it's not even an April fools joke. It was beautiful today. We opened up the SRF--the doors and transom hatches. A wonderful slightly cool breeze blew through while the sun created a warm layer of air up on the deck of the Far Reach. After developing a routine yesterday, Gayle and I pretty much had the sequence and technique down today. It was enjoyable work as we chatted about all manner of things while we cut and applied the butyl, dropped the bolts through, and tightened the nuts. At the conclusion of installing the portside fittings, we went back and retightened the starboard side. There was a little more squeeze out but not much. We will tighten them some more tomorrow and that should pretty much do it. All that will be left to do is to trim the butyl squeeze out and move on to the next task.
The wall of bronze is finally installed.